Table of Contents
How to Add the Steno Connect App
- How to enable the Steno Connect app in Zoom
- How to pre-approve the Steno Connect app in Zoom (admin guide)
- Uninstalling the Steno Connect app for Zoom
How to Use the Steno Connect App
- How to Open the Steno Connect App in Zoom
- Inviting Participants to the Steno Connect App for Zoom
- Uploading Exhibits
- Previewing and Marking Exhibits
- Presenting Marked Exhibits
- How to Use the Steno Connect Web App
- Help and Support During Proceedings
- Start and End Times
- Additional Resources
Adding the Steno Connect app to the Zoom Workplace app
How to Add the Steno Connect app (user guide)
Add the Steno Connect app to the Zoom Workplace app by clicking here or following the steps below.
To add the Steno Connect app per the below instructions, the Zoom Workplace app must be installed on a desktop or laptop device. Follow the links below to create a Zoom account and/or install the Zoom Workplace app.
- Open the Zoom desktop client and click the
Appstab in the header. - Click
Add Apps, and type Steno Connect in the search bar.
- Click the
Getbutton to the right of the app name. - The
Getbutton will becomeAddonce clicked. ClickAddto continue the process.
-
Once added, confirm by clicking the
Allowbutton.
- Once added, the original
Get/Addbutton changes toOpen.
Note: For Zoom Business and Enterprise plans, an admin may need to pre-approve the Steno Connect app for use in your organization.
- 👆Click the
Request pre-approvebutton to request access from your company’s Zoom admin.
✏️ Check out the admin guide below to see how Zoom Admins can enable the experience for their users.
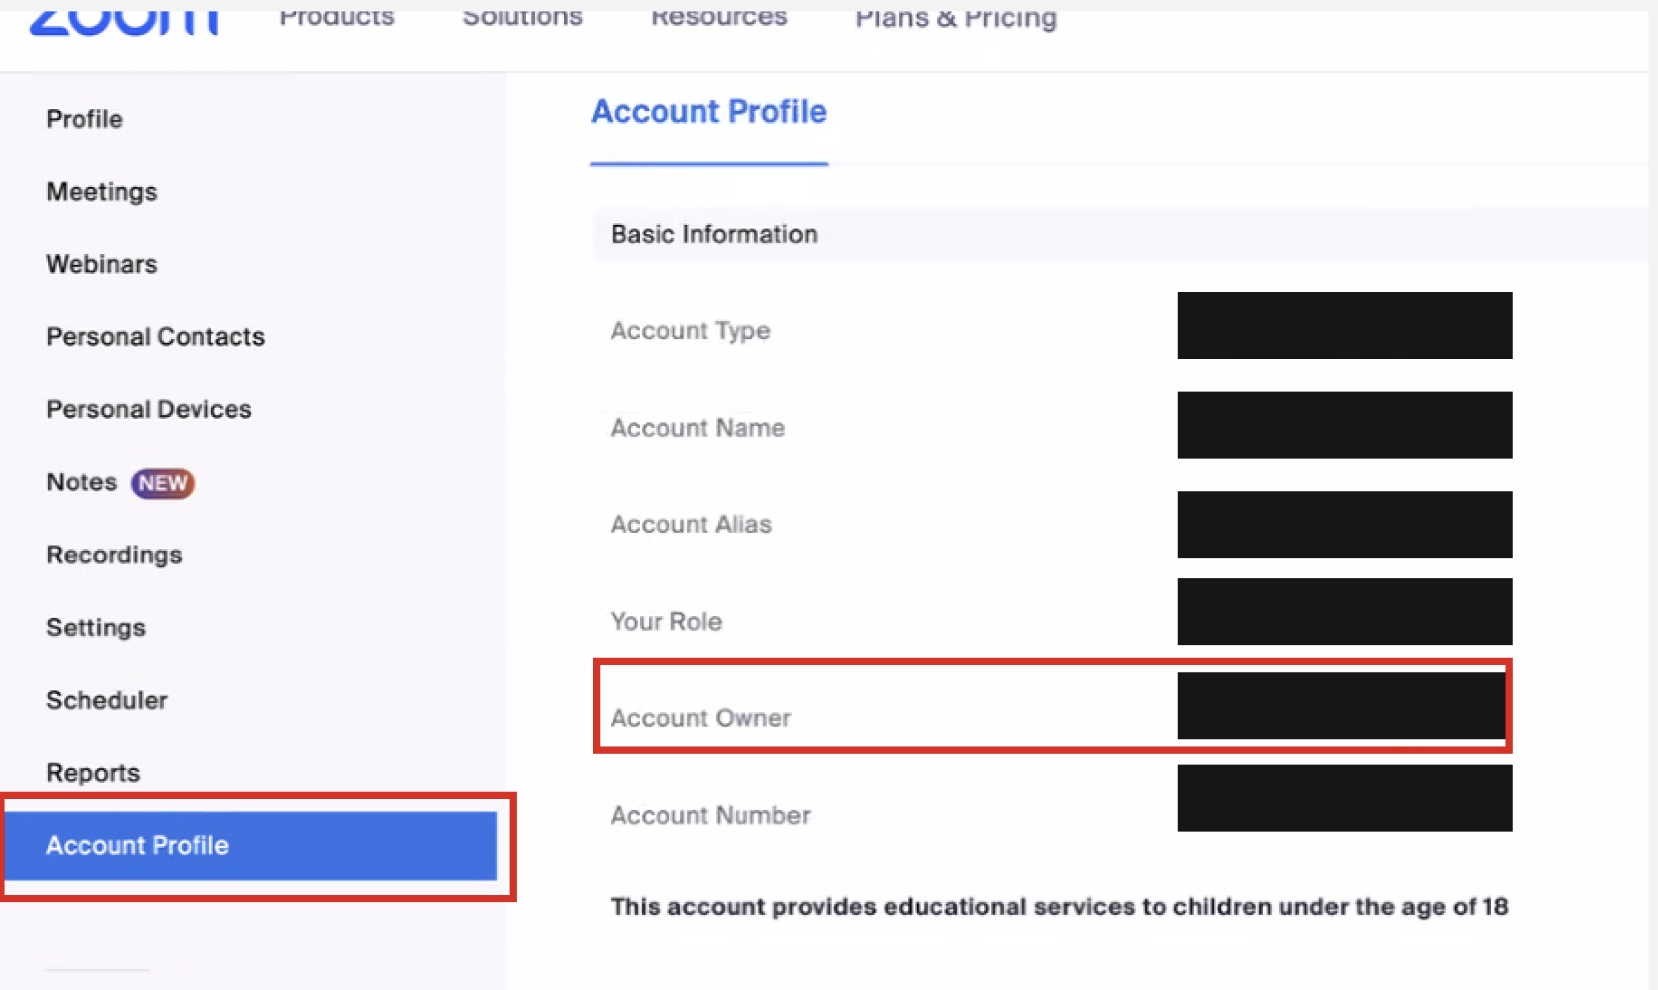
How to Find the Zoom Account Admin
- Log into the Zoom account by clicking here.
- Signing in via SSO may be necessary.

- Signing in via SSO may be necessary.
- Select
Account Profilein the left sidebar, and look for the email address listed next toAccount Owner.
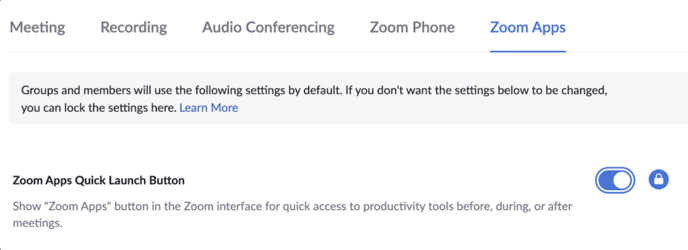
How to enable the Steno Connect app in Zoom (admin guide)
Enable Discovery of Apps:
- Log into your Zoom account and navigate to your profile: zoom.us/profile
- In the navigation panel, click Settings.
- Click the Zoom Apps tab.
- Verify that Zoom Apps Quick Launch Button is enabled. This allows users on your account to see the Zoom Apps button
 on the Zoom Workspace app.
 - If the setting is disabled, click the toggle to enable it. If a verification dialog displays, click Turn On to verify the change.
In addition, Zoom has additional documentation on enabling Zoom apps only for specific groups or users. For more information, visit the Zoom help center here.
 This will enable Zoom Apps to be in the top bar of Zoom’s main client and the bottom bar when meeting clients for users of your account.
For more information see: How to Enable Zoom Apps Button to Launch Steno Connect
How to pre-approve the Steno Connect app in Zoom (admin guide)
If you are a Zoom admin for a Zoom Business or Enterprise plan, you may need to pre-approve the Steno Connect app here for users to access it.

*Pre-approving the Steno Connect app
Selecting users on the account that can install the app
In addition to pre-approving the Steno Connect app, you can select which users or groups can install it.

*Selecting users and groups that can install the Steno Connect app
Once you have approved the Steno Connect app and installed it on your company account, users can access and install it from the Zoom client.
See Zoom’s documentation for more information.
Unauthorizing the Steno Connect app for Zoom
- Login to the Zoom App Marketplace at https://marketplace.zoom.us/user/installed.
- Click the Steno Connect App.
- Click the
Removebutton.
How to use the Steno Connect app in the Zoom Workspace app
Once authorized, the app will redirect you to your Zoom Workspace app and show the newly installed Steno Connect app.
Please note that you must install the Zoom Workspace app* and log into your Zoom account to add the app.
*See here for minimum version requirements.
How to Open the Steno Connect App in Zoom
To open the Steno Connect App, click the Apps button at the bottom of the Zoom Meeting Window. If Apps is not visible, click More to find and select Apps.

A side panel will expand on the right of the Zoom meeting room, displaying all Zoom Apps under the My Apps tab. After successfully installing the Steno Connect app, it will appear among the other Zoom apps (if applicable).

Click on Steno Connect, and the app will open on the right-side panel of the Zoom meeting room.
Please note that this process must be completed each time a Steno Zoom Meeting is entered to open and use the Steno Connect App.
If Steno Connect is not listed under the My Apps section, ensure that you:
- have signed into your Zoom account
- are using a Windows or Mac Desktop/Laptop
- have added the app (see instructions here)
How to Set the App to Auto-Open in Meetings
Automatically open the Steno Connect App when joining Zoom meetings by clicking the three dots (…) in the app window’s top-right corner. Then, select Auto-open in meetings from the drop-down menu.
Alternatively, go to the Apps tab at the top of the Zoom window when first opening and logging into the Zoom Desktop Client, click the three dots next to Steno Connect and select Auto-open in meetings.


Please note: Enabling this setting will automatically launch the app every time a Zoom meeting is entered, whether provided by Steno or not. The app can be closed anytime by clicking the Apps button at the bottom of the Zoom window or by clicking the X button on the app window.
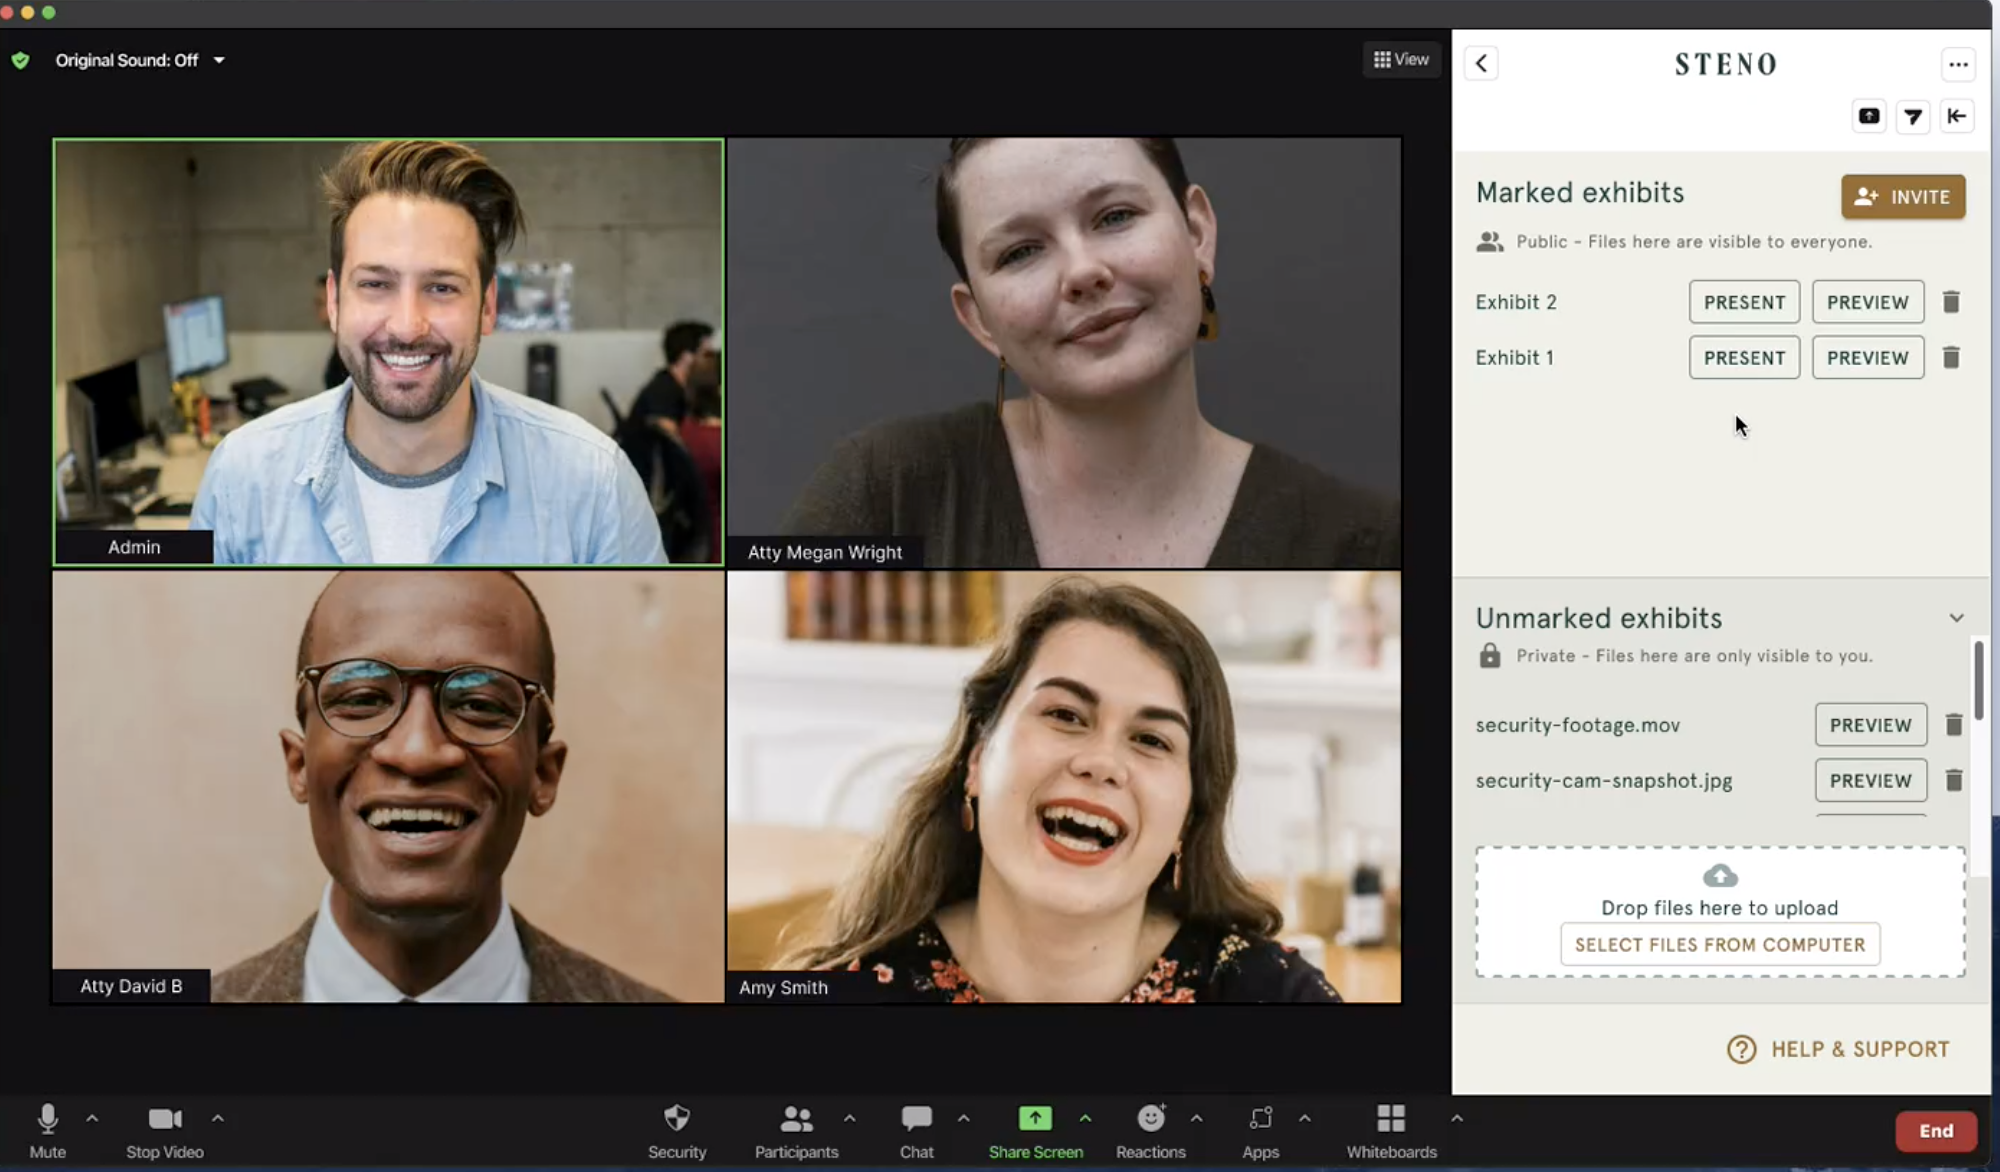
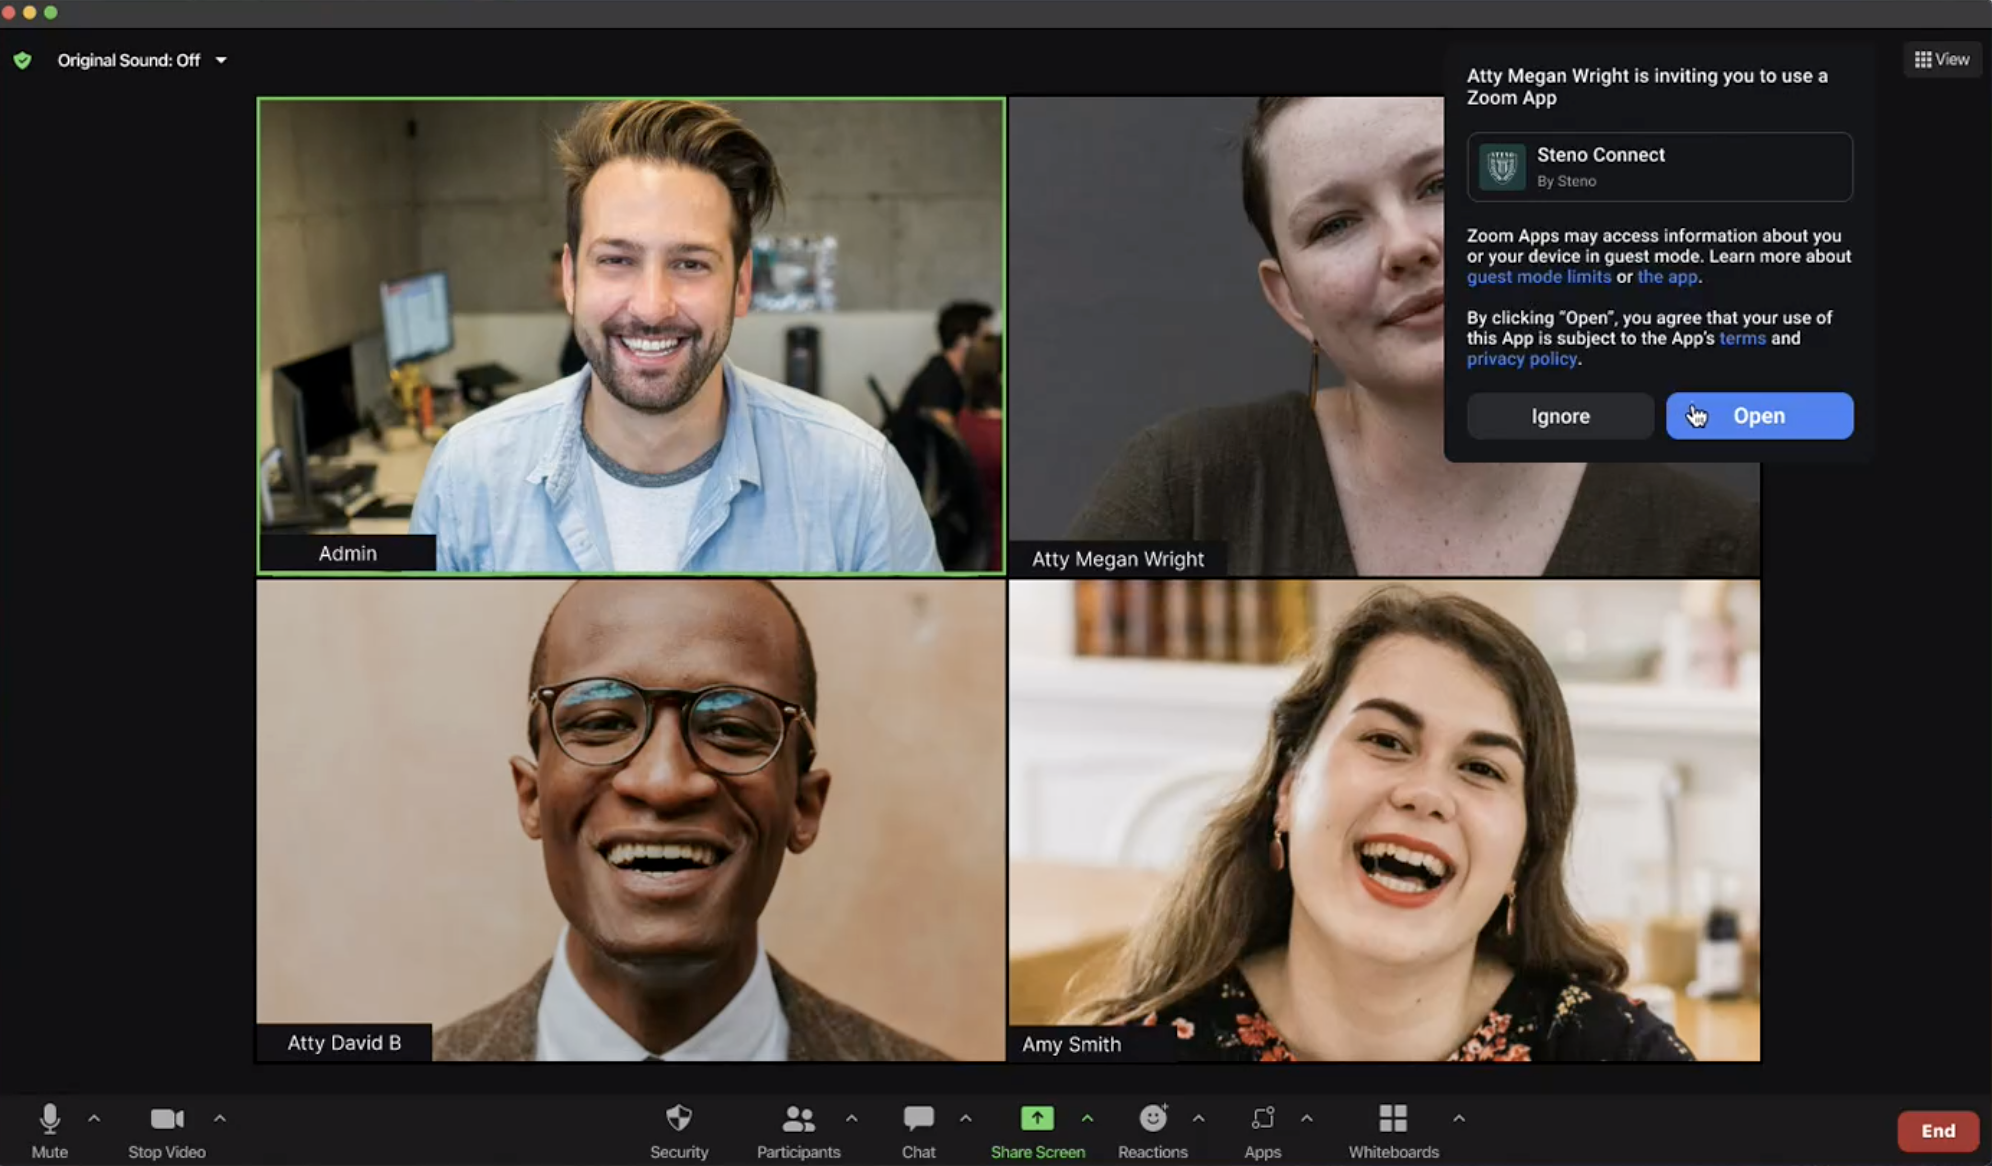
Inviting Participants to the Steno Connect App for Zoom
PLEASE NOTE: Only participants with the Steno Connect app installed can invite other participants.
- Users with the app installed can invite other participants to use the App by clicking the invite button at the top of the App window.
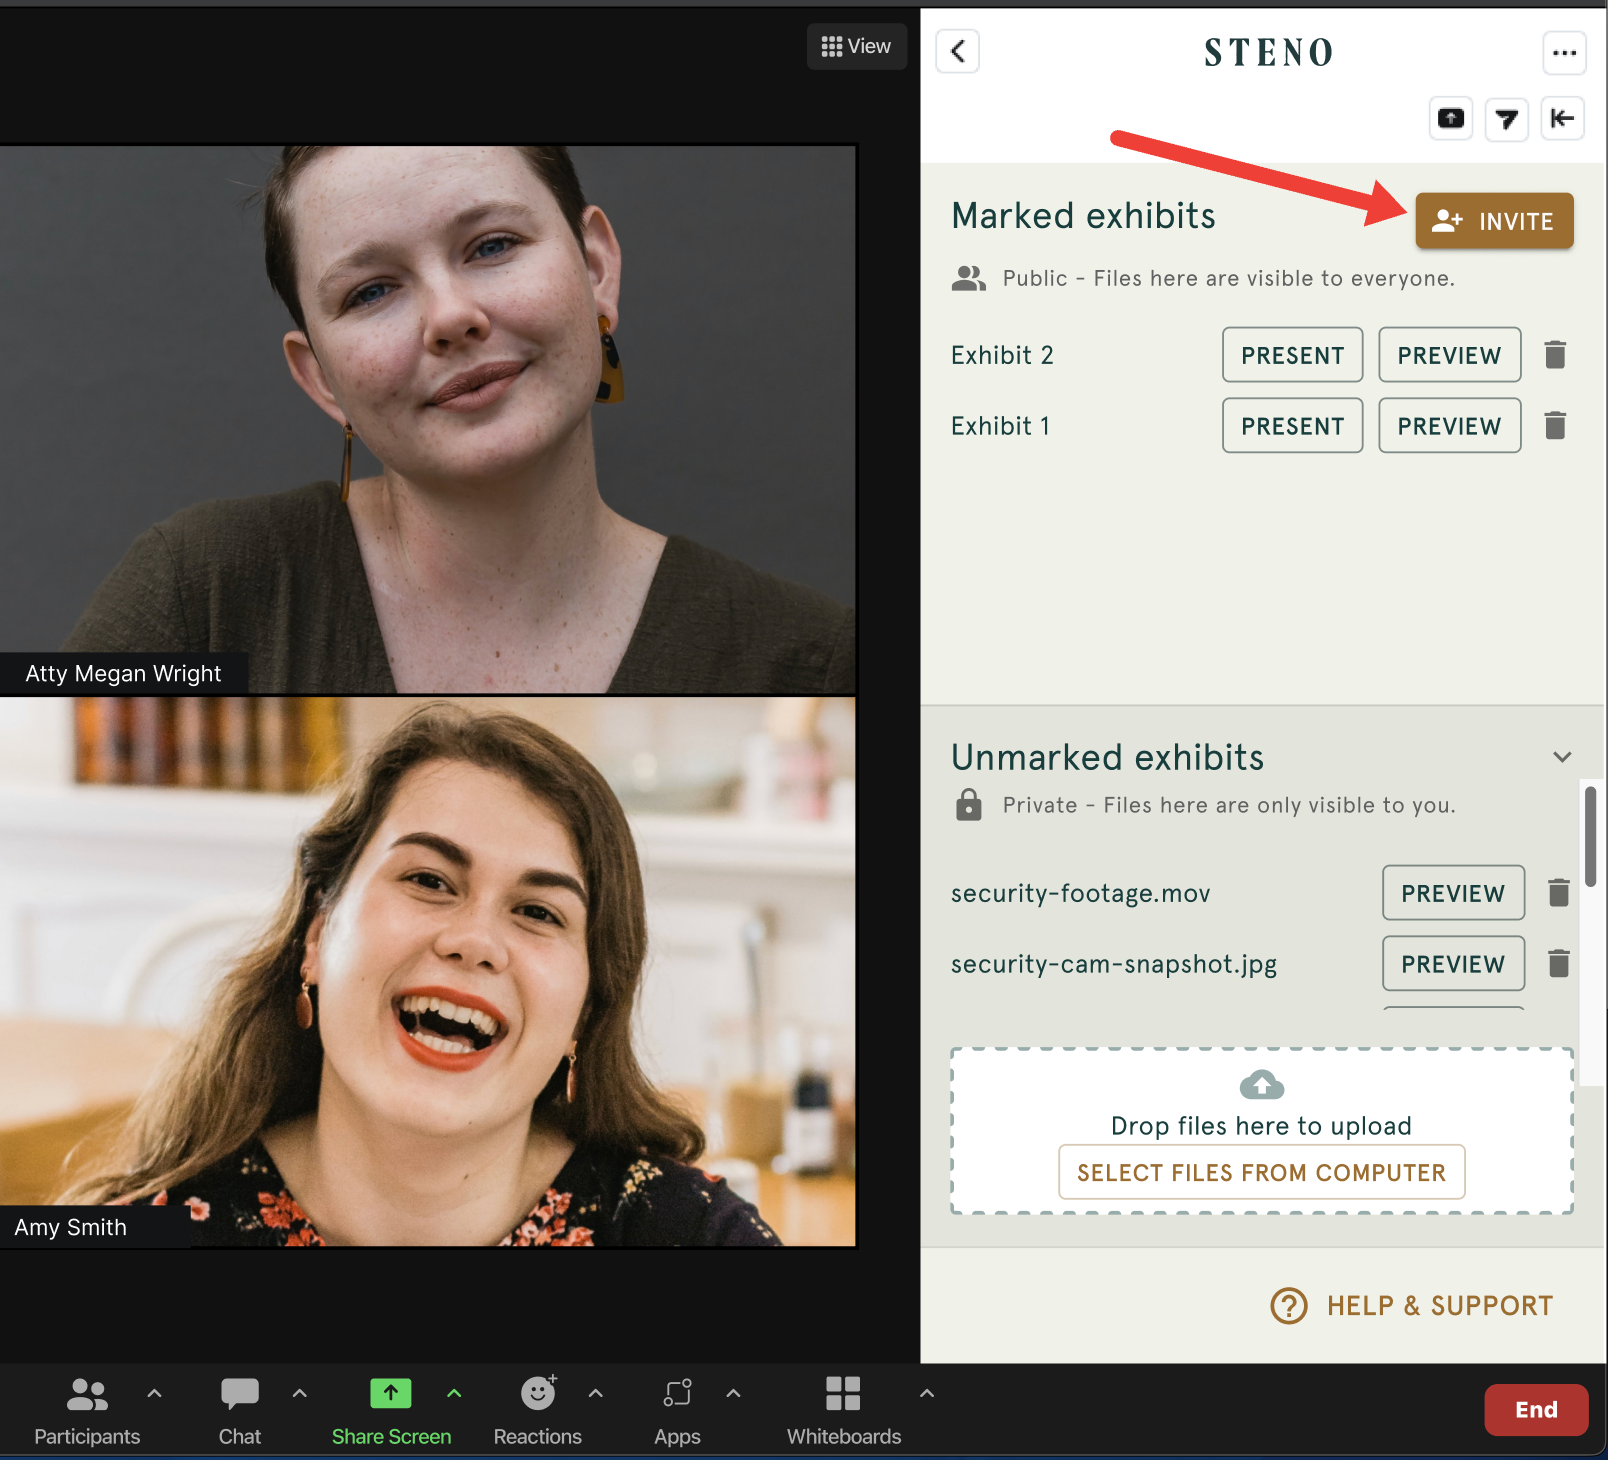
- Select the participants to invite and click the
Invitebutton.
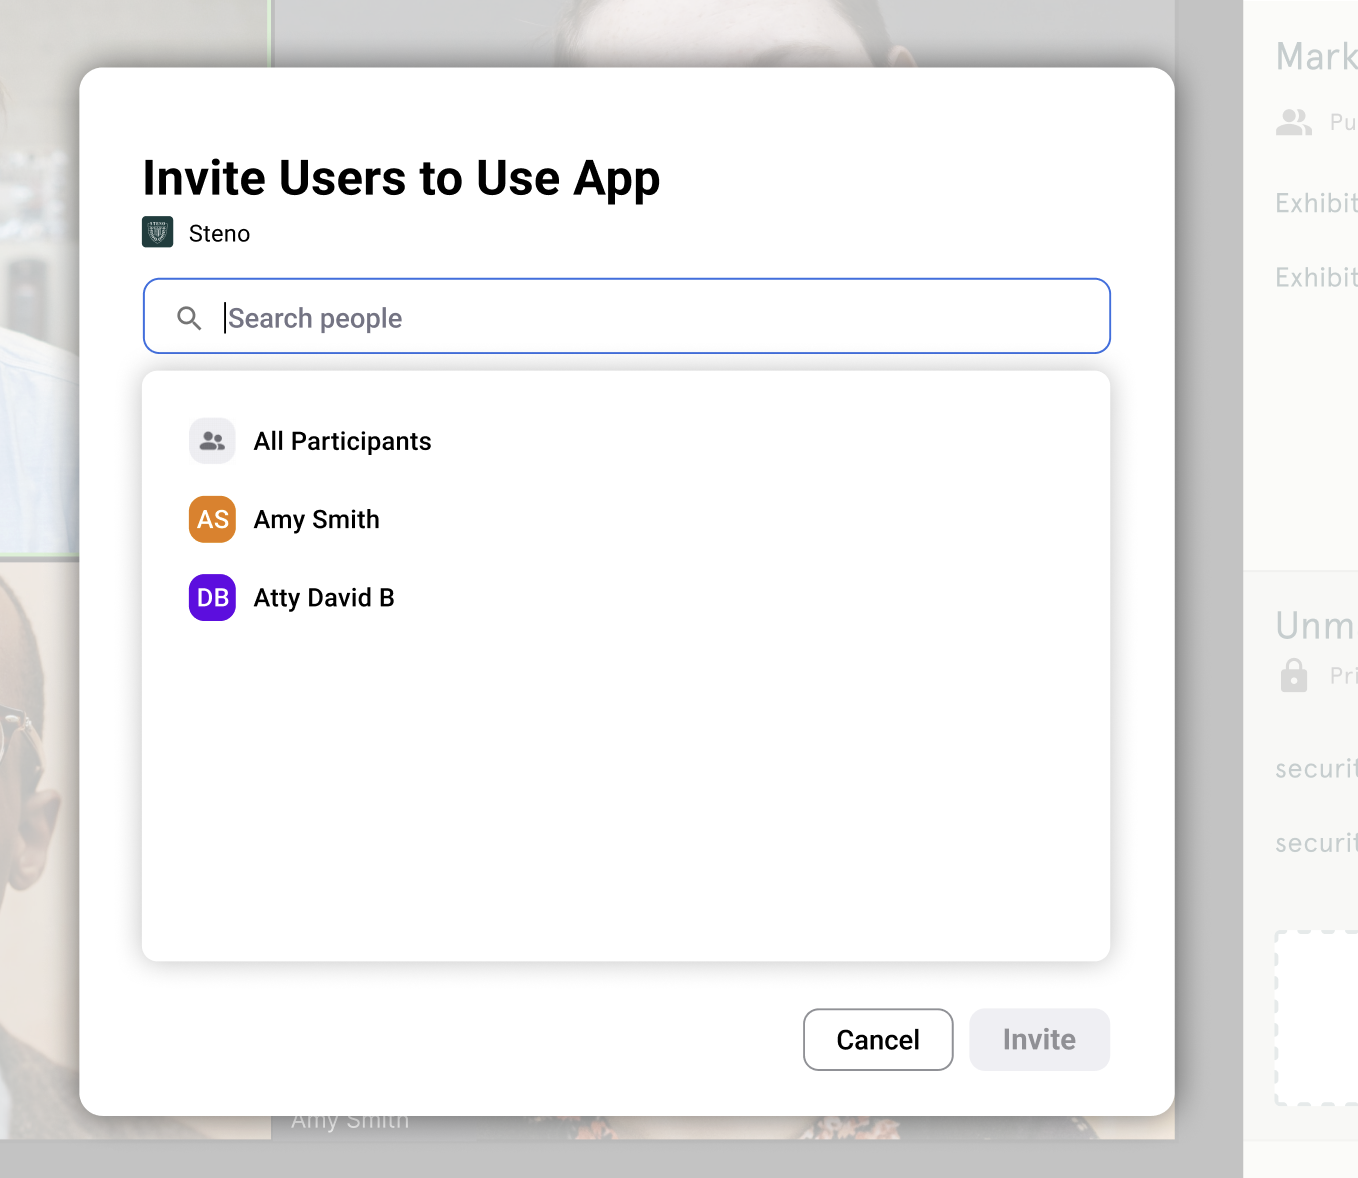
- The invitee will then receive an invite notification. Once accepted, they will have access to the Steno Connect app on the right-side panel of the Zoom meeting.
⚠️ If participants join after the invite is sent out, the installed app user must re-send invites to the new participants.
Uploading Unmarked Exhibits
Users can upload exhibits by clicking Select Files From Computer or dragging files into the drop zone.
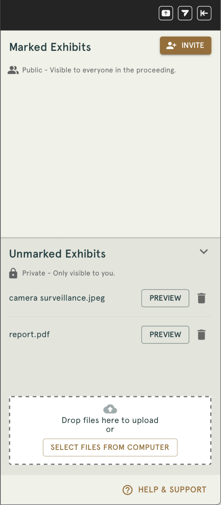
Important: If users don't sign in with their Firm Dashboard credentials on Steno Connect for Zoom, they will NOT see their unmarked exhibits across different devices. The only way for a user to see their unmarked exhibits across devices is to sign into their Firm Dashboard account on each device.
You can view this article for more information.
Supported File Types & File Sizes for Presenting & Previewing
- Below is the list of supported file types for presenting & previewing within the App:
- PDF (Portable Document Format)
- PNG (Image)
- JPG/JPEG (Image)
- TIF/TIFF (Image)
- DOC/DOCX/DOTX/DOCM (Word Document)
- PPT/PPTX/PPTM (PowerPoint Presentation)
- All other file types can be uploaded and marked. They just can't be previewed or within the Steno Connect App for Zoom or the Steno Connect web app.
- For files that aren't supported for direct previewing or presenting within the Steno Connect App, we recommend opening these files on your computer. You can then utilize Zoom's screen share feature to present the content to all participants.
- Users can upload exhibits up to 5 GB. However, presentation mode can be used for file sizes up to 50 MB.
Rotating an Exhibit
-
Two rotation arrows (left/right) are located in the header ribbon, while in
PresentandPreviewMode.

- When the user is in preview mode for the first time after the feature is released, they will see the following coach mark, ensuring they're aware of the new tool.

- Once the coach mark is closed, it will never be shown to the user again.
- Once the user rotates a page, exits preview/present mode, and previews/presents the same exhibit again, their previous rotations will be saved.
IMPORTANT: Rotation changes are only saved when the user presents/previews. If someone downloads a previously rotated exhibit, those rotation changes will NOT be saved to the downloaded exhibit.
-
If the user rotates an exhibit in presentation mode, annotates it, and then clicks
SAVE CHANGES, they will be required to mark the exhibit as a new exhibit (since it included an annotation).

IMPORTANT: The rotating feature will only rotate the page that the user is currently on. If multiple pages need to be rotated, then the user will need to scroll to each page and rotate it before clicking SAVE CHANGES.
Exhibit Sorting
- Users have the ability to sort unmarked and marked exhibits by clicking the
sort filesoption in the top right corner of the respective exhibit section.

- The available sort options are shown below:

- The default option when you open the app is
Recently marked first. Your last selected sort option will save but if you leave the room and come back, the sort will default back toRecently marked first
Previewing and Marking Exhibits
Previewing an exhibit means opening a file within the app without sharing their screen with other participants. This is simply to confirm that the file selected from the Unmarked Exhibits section is the correct file to be Marked on the record.
- To mark an exhibit, click
Previewnext to the unmarked exhibit.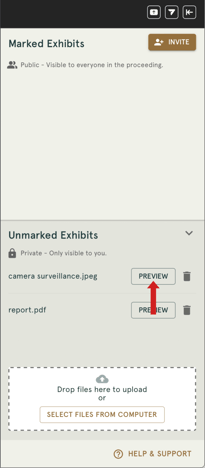
- After confirming the file via the preview function, click the
INTRODUCE EXHIBITbutton on the top right corner of the Preview Screen to mark it.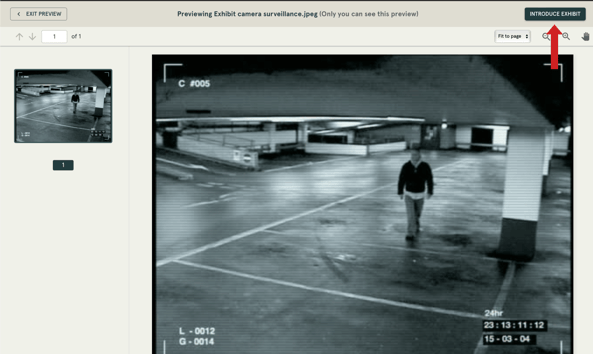
- Once the
INTRODUCE EXHIBITbutton has been clicked, the App requires the Exhibit to be labeled before it can be marked on the record.
- An exhibit number will auto-populate based on the number of files uploaded before it.
- The suggested exhibit number can be overwritten by typing the preferred exhibit label into the Exhibit number box.
- Whatever labeling system is set up will continue for all remaining exhibits. For example, if the Exhibit number is overwritten to start at A, the next auto-suggested exhibit number will be B.

- Click
Yes, Introduce Exhibitto mark the exhibit on the record. This will make the exhibit visible to all meeting participants via theMarked Exhibitssection.-png.png?width=239&height=547&name=Group%20346%20(1)-png.png)
Presenting Marked Exhibits
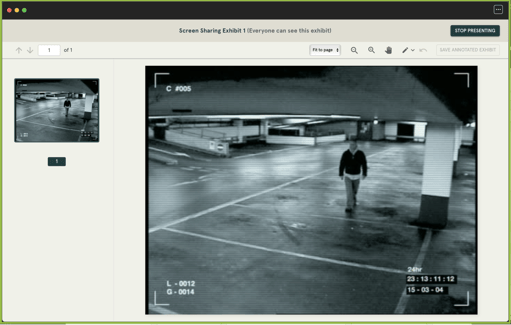
By clicking the Present button next to the marked exhibit file, users will share the selected exhibit with the rest of the Zoom participants.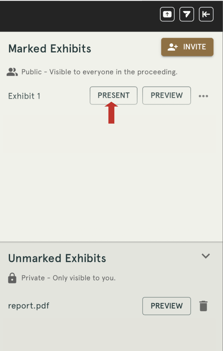
Annotating an Exhibit
-
Zoom participants can annotate marked exhibits after selecting
Present.
IMPORTANT: Only the user presenting the exhibit can annotate it. This means that the user must have the app installed or use guest mode to annotate.
-
After clicking
Present, the user will see an 'Annotate' button.
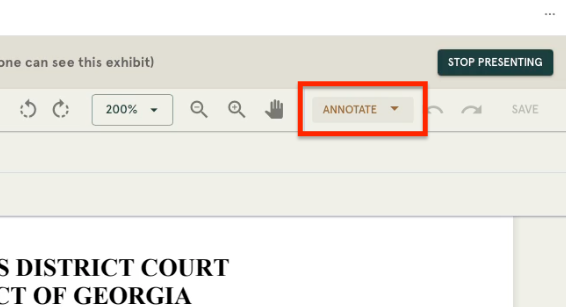
-
After selecting
Annotate, the annotation toolbar with a comprehensive suite of professional markup tools will appear. Learn more about the annotation toolbar here
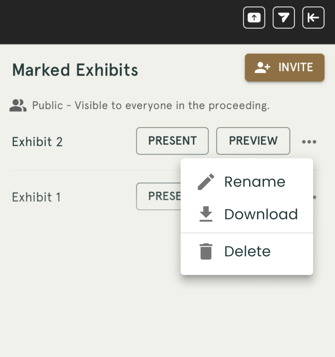
Renaming, Downloading, and Deleting Exhibits
-
In the web app or Zoom client, if the user clicks on the ellipsis next to a marked exhibit, they can Rename, Download, or Delete an exhibit.
IMPORTANT: Only the user who marked the exhibit can rename or delete it.
How to Use the Steno Connect Web App
- Though using the Steno Connect app directly from the Zoom platform is preferred, there may be times when a user isn't able to (e.g., joining the depo from an unsupported device such as an iPad, a user's Zoom admin has not yet approved the app, etc.).
- For these times when a user can't access the Steno Connect app, we recommend using the web app version of Steno Connect.
Accessing the Steno Connect Web App
- After entering user information on the initial join page screen, the browser page will become the Steno Connect Web App.


Steno Connect Web App Features & Functionality
- The feature parity between the Steno Connect web app and the Zoom app is quite similar. So much so that you can reference the majority of feature explanations listed above when understanding the features provided in the web app.
- The main difference between the Steno Connect Zoom app and the Web App is that the Web App does not have the
PRESENTfeature.- This means that the
PREVIEWbutton next to the respective exhibit must first be clicked to share an exhibit with participants. Then click theSHAREbutton from the bottom navigation bar of the Zoom app.
- This means that the
IMPORTANT: When screen sharing from the Web App, the PREVIEW button must be clicked BEFORE screen sharing. Additionally, Zoom screen sharing should be stopped BEFORE closing the preview. Not following these instructions could result in screen sharing your unmarked exhibits section that may hold private exhibits.
PLEASE NOTE:Exhibits in the incorrect orientation MUST be corrected before being introduced so that they can be displayed properly when screen sharing via Zoom.- As there is no
PRESENTfeature in the Steno Connect Web App, there is no ability to annotate exhibits or save annotated exhibits within the Web App.- See our article on How to Annotate Exhibits in Zoom to learn how to use Zoom's annotation features and save an annotated exhibit through Zoom.
- The lack of present and annotation features is why we recommend using the Steno Connect Zoom App over the Web App.
Exhibit Sharing with a Browser
After signing in to enter the Zoom room, users can re-visit the sign-in page to upload and access shared exhibits if they do not have the Steno Connect app installed.

The browser version of the Steno Connect app functions almost the same way as the installed Steno Connect app version. However, users will need to click Present and then Screen Share from the Zoom room to ensure other participants see the exhibit they are presenting in the browser version.
Help and Support During Proceedings
If you run into any issues or have any questions while using the App during a proceeding and there isn't a Steno Videographer or Steno Technical Assistant in the room to assist, you can call our Tech Support Line at 888.404.0390.
This information is also available by clicking on the HELP & SUPPORT button located at the bottom right-hand corner of the Steno Connect App.


Start and End Times
- Users will be restricted from entering the Zoom room until an hour before the scheduled start time. This also means they can only upload and mark exhibits within the app an hour before the start time.
- For information on pre-uploading exhibits in advance, please see How to Upload Exhibits Before a Deposition on Steno Connect for Zoom.
- The room and exhibit page will close 24 hours after the job's scheduled start time.
Additional Resources:
- What is the Steno Connect App for Zoom, and How Does it Replace the Legacy Steno Connect Platform?
- How to Upload Exhibits Before a Deposition on Steno Connect for Zoom
- How Do Admins Manage Users in the Firm Dashboard?
- View our Interactive Demo