Streamline your firm’s login process and enhance security by enabling SAML Single Sign-On (SSO). This allow your users to log into Steno using your organization’s centralized identity provider (IdP) like Azure AD, Okta, or Google Workspace.
Prerequisites
-
You must have Admin permissions in Steno to access these settings.
-
You will need your identity provider’s Metadata URL or Metadata XML file ready before starting.
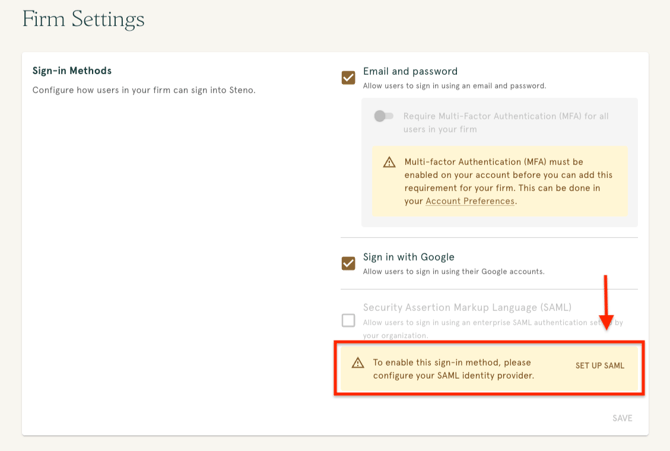
Step 1: Navigate to Firm Settings
-
Log in to your Steno dashboard.
-
In the top navigation bar, click on Admin and select Firm Settings from the dropdown menu.
-
Scroll down to the Sign-in Methods section.
Step 2: Initiate SAML Setup
Click the Set up SAML button. This will open a configuration modal.
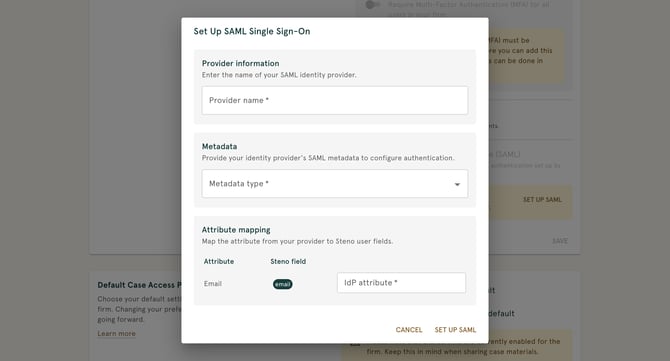
Step 3: Fill In Set Up Fields
1. Enter Provider Name:
-
Enter a friendly name for your identity provider (e.g., "Azure SSO" or "Okta"). This name may be visible to your users on the sign-in screen.
2. Choose how you want to provide your IdP’s configuration details:
-
Metadata URL: Select this option if you have a hosted URL for your metadata. Simply paste the link into the field provided.
-
Metadata XML: Select this if you have downloaded a configuration file from your IdP. Click Upload XML File to select the file from your computer.
Step 4: Attribute Mapping
To ensure users are correctly identified, you must map the email attribute from your IdP to Steno.
-
Under Attribute Mapping, locate the email field.
-
Enter the corresponding IdP attribute name used by your provider
Step 5: Security Settings (Optional)
Depending on your firm's security requirements, you can enable additional options:
-
Enable SAML request signing (SHA-256): Check this to verify that requests come from your organization and prevent tampering.
-
Require encrypted assertions: Check this to require your IdP to encrypt user data sent during login.
Step 6: Complete Setup
-
Click the Set up SAML button at the bottom of the modal.
-
A success message will appear: "Your SAML configuration has been set up. This may take a few minutes to process."
-
Refresh the page after a few minutes to see the updated status.
What Your Users Will Experience
Enabling SAML does not switch your users to SSO automatically, and it does not sign them out of their current sessions. Each existing user completes a short, one-time step to move their account to SAML the next time they sign in.
When the Change Takes Effect
Users with an active session stay signed in until that session ends. Each user is then moved to SAML the next time they sign in, so expect a transition period as users migrate as they sign back in. Alternatively, a user can trigger this anytime from Account Preferences, under Sign-in settings, by clicking EMAIL SIGN-IN RESET LINK.
Resetting Sign-In Settings (Existing Users)
- The user goes to the Steno sign-in page and enters their email and current password as usual.
- After their password is accepted, Steno recognizes that the firm now requires SAML and stops the password login. The user is emailed a link to update their sign-in settings and sees a page titled "Your firm has updated their sign-in requirements" with the message: "We've sent a link to reset your sign-in settings to your email. If you don't see it in your inbox within a few minutes, please check your spam folder."
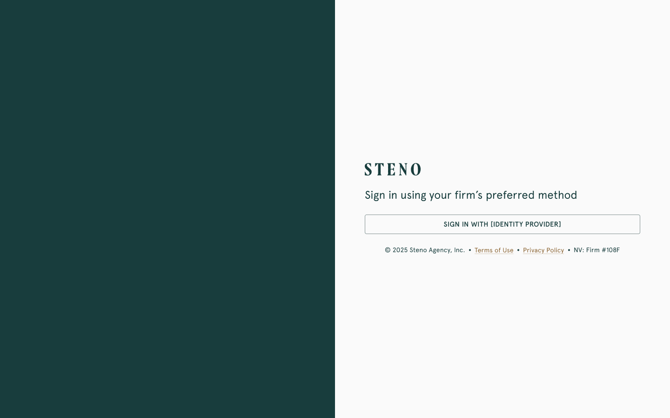
- The user opens the email and clicks the link, which takes them to a page headed "Select your preferred sign-in method."
- The page shows a notice: "You are required to sign in with [Provider Name]," followed by a Continue With [Provider Name] button. The user clicks it.
- Steno sends the user to your identity provider to authenticate. Once they sign in there, their account is set to SAML and they are returned to Steno.
From this point on, the user enters their email on the sign-in page and is sent straight to your identity provider. They no longer see a Steno password screen.
Forgot password? The reset link is sent only after a successful password login. A user who can't sign in should use the Forgot password link on the sign-in page instead. That sends the same sign-in settings link, where they can select your SAML provider and finish the switch.
New Users Invited After SAML is Enabled
Users invited after SAML is enabled set up their account against your sign-in requirements from the start. Their account setup routes them to your identity provider rather than asking them to create a Steno password.
Troubleshooting
If you encounter errors during setup, ensure that:
-
The Metadata URL/File is current and hasn't expired.
-
The Attribute Mapping for the email exactly matches the claim name sent by your IdP.
Need further assistance? Reach out to our support team at concierge@steno.com.